YOLOv5
In this tutorial, you will implement a function that takes in an image and runs it through an object detection model to find what objects are in the image and where using the YOLOv5 model.
Viewing this Demo
In order to view this demo download the PlayTorch app.
Preview
If you want a sneak peek at what you'll be building, run this Snack by scanning the QR code in the PlayTorch app!
Overview
We'll go through the following steps:
This tutorial will focus on the machine learning aspects of creating this object detection prototype. In order to focus on machine learning, we will provide the UI code for you.
- Create a copy of the starter Expo Snack
- Run the project in the PlayTorch app
- Create an image handler function
- Convert image to tensor ready for inference
- Load model and run inference
- Format model output
- Display results
Copying the Starter Snack
Click the button below to open your own copy of the starter Expo Snack for this tutorial. It will open a new tab to an Expo Snack, the in-browser code editor we will use for this tutorial that allows us to test our code in the PlayTorch app.
Click to Copy Starter SnackLet's run through a quick overview of everything that you can find in the starter snack.
screens/
├─ CameraScreen.js
├─ LoadingScreen.js
├─ ResultsScreen.js
App.js
CoCoClasses.json
ObjectDetector.js
package.json
screens/
The screens folder contains three files -- one for each screen of the object detection prototype we are building.
CameraScreen.js- A full screen camera view to capture the image we will run through our object detection modelLoadingScreen.js- A loading screen that let's the user know the image is being processedResultsScreen.js- A screen showing the image and the bounding boxes of the detected objects
App.js
This file manages which screen to show and helps pass data between them.
CoCoClasses.json
This file contains the labels for the different classes of objects that our model has been trained to detect.
ObjectDetector.js
This file will contain the code that actually runs our machine learning model.
package.json
This file contains a list of packages that our project depends on so the app knows to download them.
Running the project in the PlayTorch app
Open the PlayTorch app and from the home screen, tap "Scan QR Code".
If you have never done this before, it will ask for camera permissions. Grant the app camera permissions and scan the QR code from the right side of the Snack window.
If you haven't made any changes to the snack, you should see a screen that looks like this (with a different view in your camera of course):
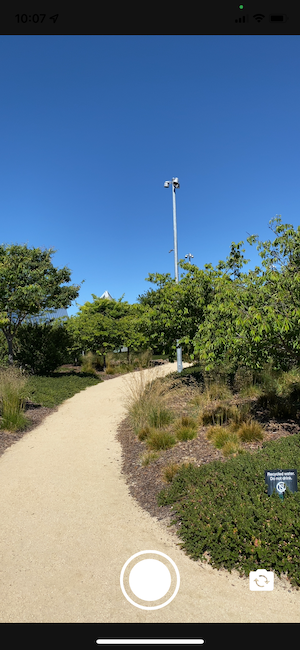
In this starter state, nothing happens when you press the camera's capture button. Let's fix that.
Create an image handler function
In the initial state of the codebase, if we look into our CameraScreen.js file, we will notice:
- It is expecting an
onCapturefunction as a prop (line 6) - It passes the
onCaptureprop to the<Camera />component provided byreact-native-pytorch-core(line 12)
import * as React from 'react';
import {useRef} from 'react';
import {StyleSheet} from 'react-native';
import {Camera} from 'react-native-pytorch-core';

export default function CameraScreen({onCapture}) {
  const cameraRef = useRef(null);
  return (
    <Camera
      ref={cameraRef}
      style={styles.camera}
      onCapture={onCapture}
      targetResolution={{width: 1080, height: 1920}}
    />
  );
}

const styles = StyleSheet.create({
  camera: {width: '100%', height: '100%'},
});
However, currently the code in our App.js file doesn't pass anything to our <CameraScreen /> component. Make the changes in the code below to your App.js file to create a function for handling captured images.
Here is a quick summary of the changes that we are making:
- Create a new async function called
handleImagethat does the following:- Log the image so we can inspect it
- Release the image so it doesn't leak memory
- Pass the new
handleImageproperty to theonCaptureprop
import * as React from 'react';
import {useCallback, useRef, useState} from 'react';
import {
  ActivityIndicator,
  Button,
  SafeAreaView,
  StyleSheet,
  Text,
  TouchableOpacity,
  View,
} from 'react-native';
import {Camera, Canvas, Image} from 'react-native-pytorch-core';
import detectObjects from './ObjectDetector';
import CameraScreen from './screens/CameraScreen';
import LoadingScreen from './screens/LoadingScreen';
import ResultsScreen from './screens/ResultsScreen';

const ScreenStates = {
  CAMERA: 0,
  LOADING: 1,
  RESULTS: 2,
};

export default function YOLOv5Example() {
  const [image, setImage] = useState(null);
  const [boundingBoxes, setBoundingBoxes] = useState(null);
  const [screenState, setScreenState] = useState(ScreenStates.CAMERA);

  // Handle the reset button and return to the camera capturing mode
  const handleReset = useCallback(async () => {
    setScreenState(ScreenStates.CAMERA);
    if (image != null) {
      await image.release();
    }
    setImage(null);
    setBoundingBoxes(null);
  }, [image, setScreenState]);

  // This handler function handles the camera's capture event
  async function handleImage(capturedImage) {
    console.log('Captured image', capturedImage);
    capturedImage.release();
  }

  return (
    <SafeAreaView style={styles.container}>
      {screenState === ScreenStates.CAMERA && (
        <CameraScreen onCapture={handleImage} />
      )}
      {screenState === ScreenStates.LOADING && <LoadingScreen />}
      {screenState === ScreenStates.RESULTS && (
        <ResultsScreen
          image={image}
          boundingBoxes={boundingBoxes}
          onReset={handleReset}
        />
      )}
    </SafeAreaView>
  );
}

const styles = StyleSheet.create({
  container: {
    flex: 1,
  },
});
Run the updated code on the PlayTorch app, press the camera capture button and then check the logs to see what it output.
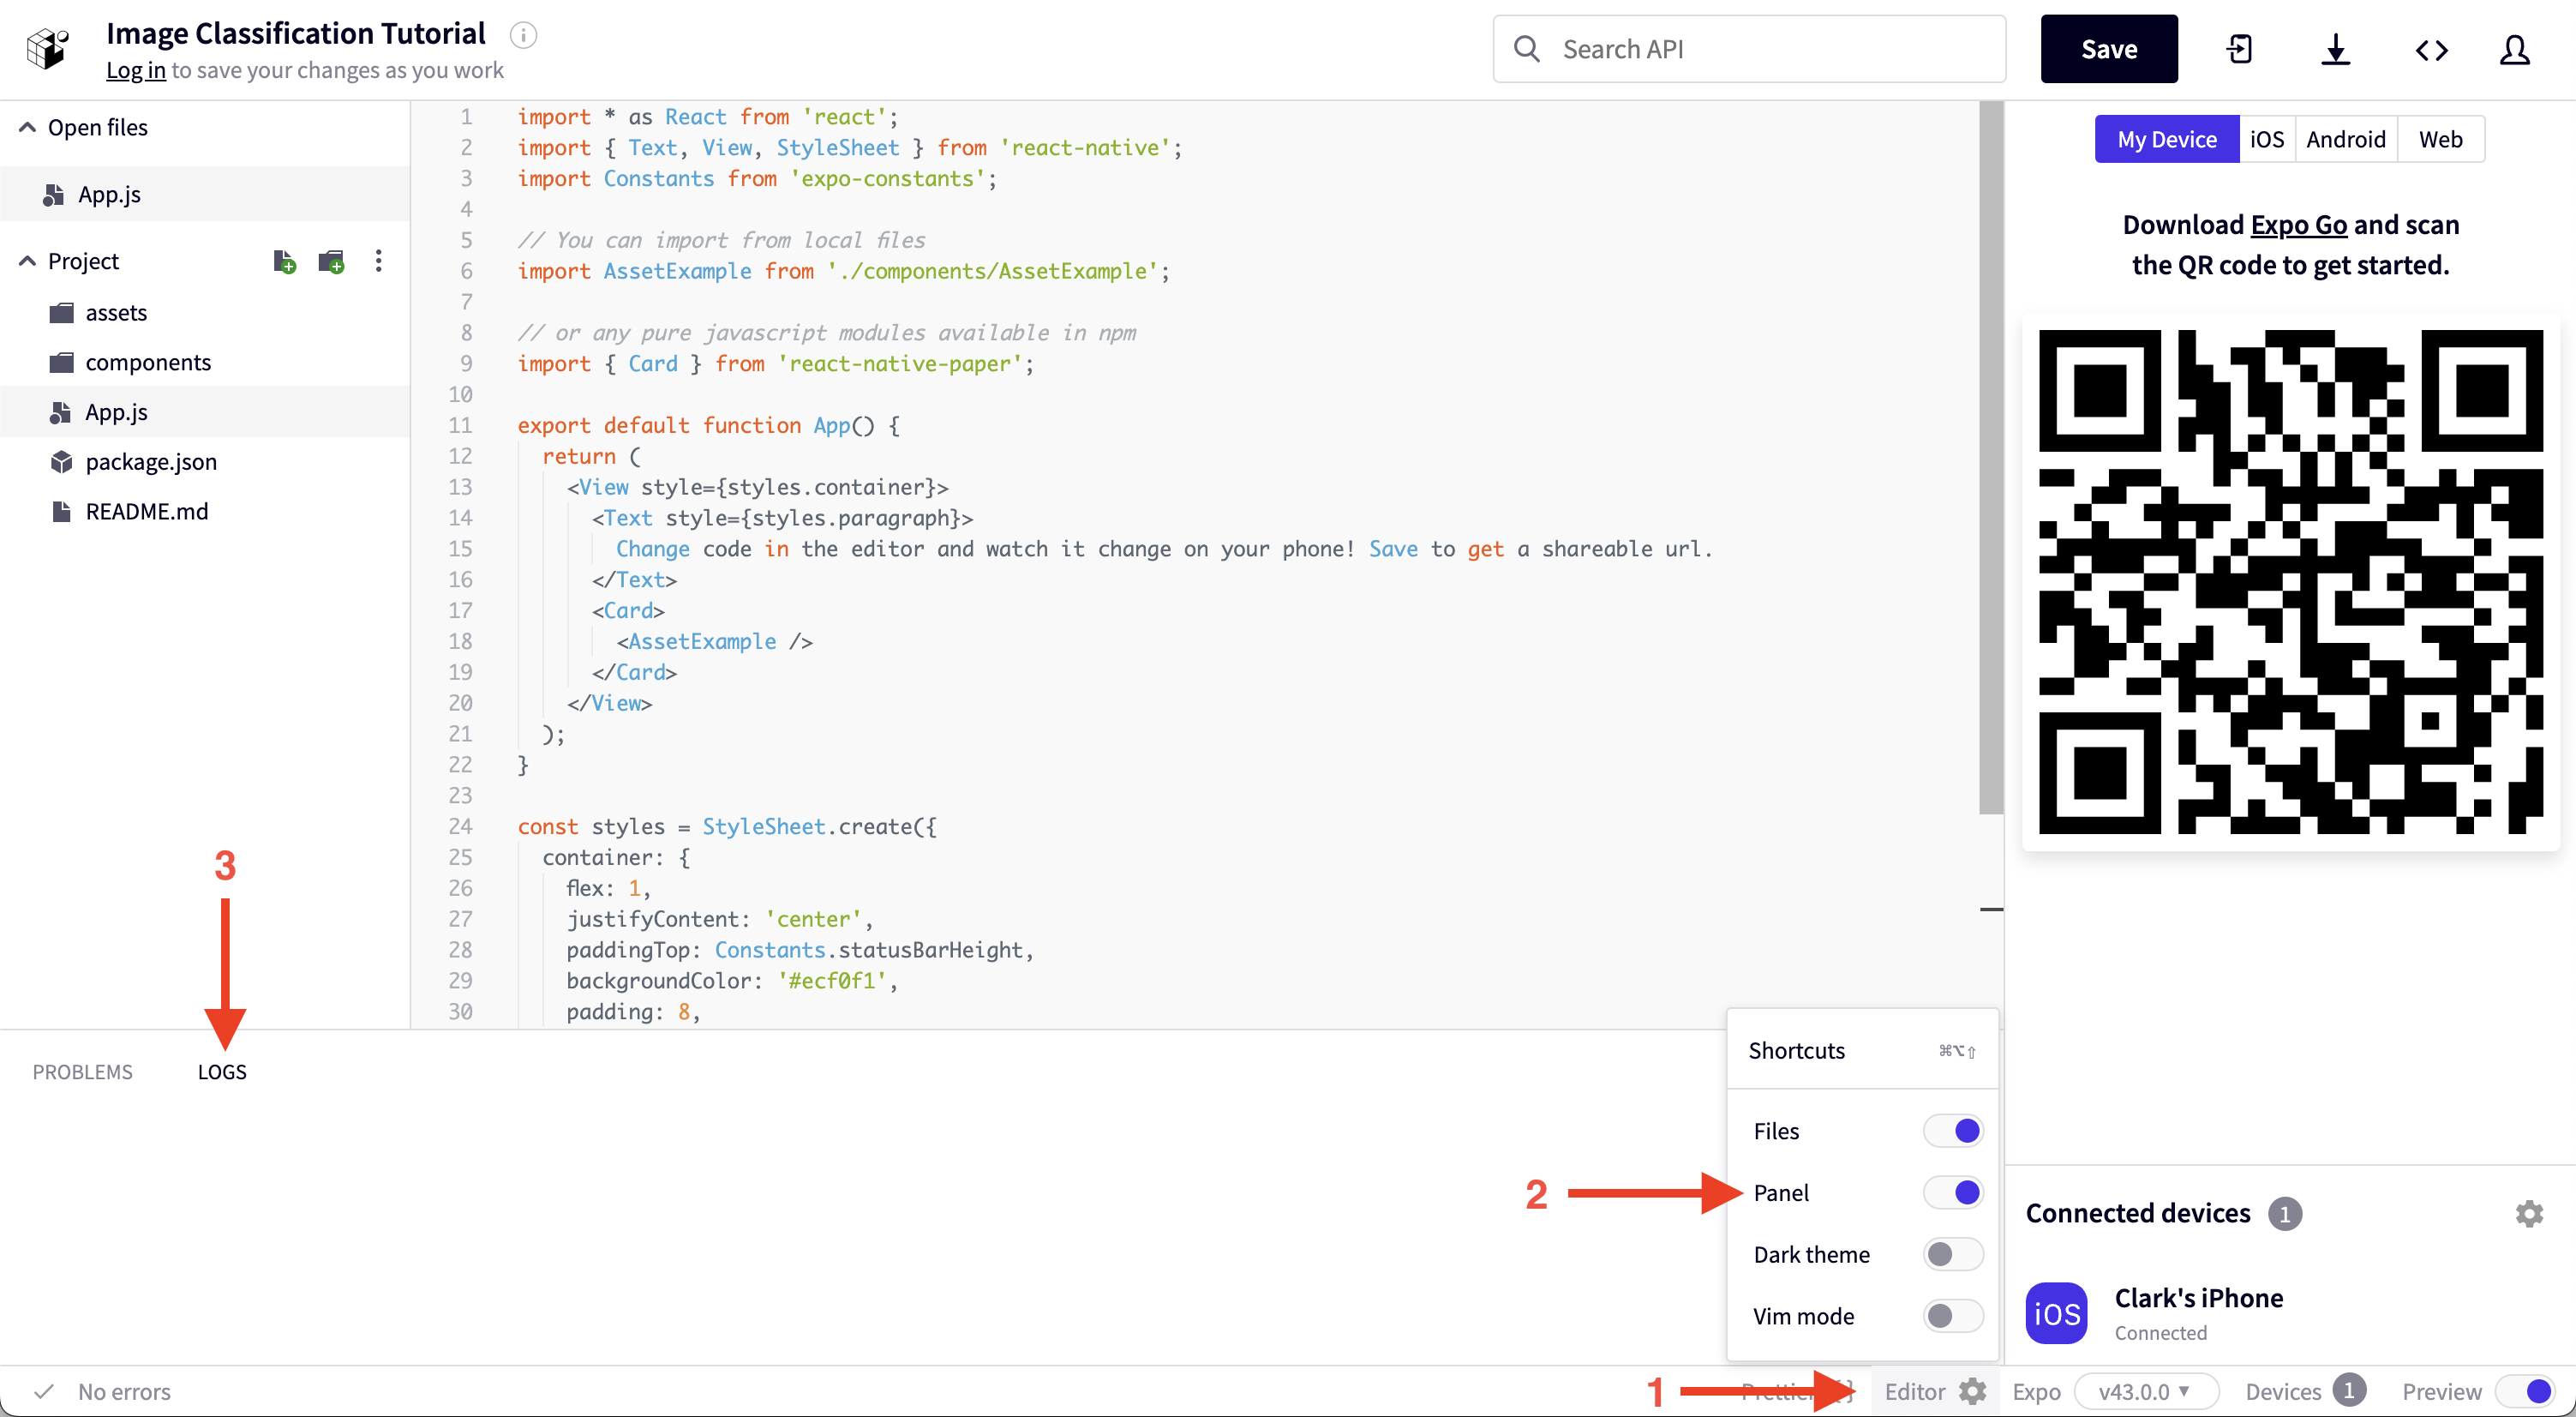
Open the logs in the Snack window by clicking the settings gear icon at the bottom of the window, enabling the Panel, and clicking the logs tab of the newly opened panel.
You should see something like the following, but with a different ID:
Captured image {"ID":"ABEF4518-A791-45C3-BA5C-C424F96C58EC"}
Now that we have access to the images that we are capturing, let's write some code to convert them into a format that our ML model can understand.
Convert image to tensor ready for inference
In order to keep our code clean and simple to understand, we will seperate all of the code that interacts with the ML model into its own file. That file already exists and is called ObjectDetector.js.
Open that file and notice it is a rather bare file. All that it does at the moment is export an async function called detectObjects that expects an image as a parameter.
export default async function detectObjects(image) {}
The model we will be using for object detection is called YOLOv5. YOLO an acronym for 'You only look once', is an object detection algorithm that divides images into a grid system. Each cell in the grid is responsible for detecting objects within itself.
The YOLOv5 model only knows how to process data in a very specific format. We will be converting our image into a tensor (a multi-dimensional array) and then rearranging the data in that tensor to be formatted just how YOLOv5 expects it.
The code below does all the transformations needed to the image. Here's a summary of what is going on:
- Import
media,torch, andtorchvisionfrom the PlayTorch SDK (react-native-pytorch-core) - Create variable
Tthat is a shortcut way of accessingtorchvisions.transformssince we will be using the transforms a lot - Create variable
IMAGE_SIZEand set it to640(based on YOLOv5 model input) - Update the empty
detectObjectsfunction to do the following:- Store the dimensions of the
imagetoimageWidthandimageHeightvariables - Create a
blob(a raw memory store of file contents, which in this case contains the RGB byte values) from theimageparameter using themedia.toBlobfunction - Create a
tensorwith the raw data in the newly createdbloband with the shape defined by the array[imageHeight, imageWidth, 3](the size of the image and 3 for RGB) - Rearange the order of the tensor so the channels (RGB) are first, then the height and width
- Transform all the values in the tensor to be floating point numbers between 0 and 1 instead of byte values between 0 and 255
- Create a resize transformation with size 640 called
resize - Apply the
resizetransformation to the tensor - Create a center crop transformation with sizes 640 x 640 called
centerCrop - Apply the
centerCroptransformation to the tensor - Add an extra leading dimension to the tensor with
tensor.unsqueeze - Log the final shape to make sure it matches the format the model needs which is
[1, 3, 640, 640]
- Store the dimensions of the
import {media, torch, torchvision} from 'react-native-pytorch-core';

const T = torchvision.transforms;
const IMAGE_SIZE = 640;

export default async function detectObjects(image) {
  // Get image width and height
  const imageWidth = image.getWidth();
  const imageHeight = image.getHeight();

  // Convert image to blob, which is a byte representation of the image
  // in the format height (H), width (W), and channels (C), or HWC for short
  const blob = media.toBlob(image);

  // Get a tensor from image the blob and also define in what format
  // the image blob is.
  let tensor = torch.fromBlob(blob, [imageHeight, imageWidth, 3]);

  // Rearrange the tensor shape to be [CHW]
  tensor = tensor.permute([2, 0, 1]);

  // Divide the tensor values by 255 to get values between [0, 1]
  tensor = tensor.div(255);

  // Resize the image tensor to 3 x min(height, IMAGE_SIZE) x min(width, IMAGE_SIZE)
  const resize = T.resize([IMAGE_SIZE, IMAGE_SIZE]);
  tensor = resize(tensor);

  // Center crop the image to IMAGE_SIZE x IMAGE_SIZE
  const centerCrop = T.centerCrop([IMAGE_SIZE]);
  tensor = centerCrop(tensor);

  // Unsqueeze adds 1 leading dimension to the tensor
  const formattedInputTensor = tensor.unsqueeze(0);

  console.log(formattedInputTensor);
}
In order for us to be able to run and test this, let's make a quick update to the App.js file to make the handleImage function call our updated detectObjects function.
import * as React from 'react';
import {useCallback, useRef, useState} from 'react';
import {
  ActivityIndicator,
  Button,
  SafeAreaView,
  StyleSheet,
  Text,
  TouchableOpacity,
  View,
} from 'react-native';
import {Camera, Canvas, Image} from 'react-native-pytorch-core';
import detectObjects from './ObjectDetector';
import CameraScreen from './screens/CameraScreen';
import LoadingScreen from './screens/LoadingScreen';
import ResultsScreen from './screens/ResultsScreen';

const ScreenStates = {
  CAMERA: 0,
  LOADING: 1,
  RESULTS: 2,
};

export default function ObjectDetectionExample() {
  const [image, setImage] = useState(null);
  const [boundingBoxes, setBoundingBoxes] = useState(null);
  const [screenState, setScreenState] = useState(ScreenStates.CAMERA);

  // Handle the reset button and return to the camera capturing mode
  const handleReset = useCallback(async () => {
    setScreenState(ScreenStates.CAMERA);
    if (image != null) {
      await image.release();
    }
    setImage(null);
    setBoundingBoxes(null);
  }, [image, setScreenState]);

  // This handler function handles the camera's capture event
  async function handleImage(capturedImage) {
    await detectObjects(capturedImage);
    capturedImage.release();
  }

  return (
    <SafeAreaView style={styles.container}>
      {screenState === ScreenStates.CAMERA && (
        <CameraScreen onCapture={handleImage} />
      )}
      {screenState === ScreenStates.LOADING && <LoadingScreen />}
      {screenState === ScreenStates.RESULTS && (
        <ResultsScreen
          image={image}
          boundingBoxes={boundingBoxes}
          onReset={handleReset}
        />
      )}
    </SafeAreaView>
  );
}

const styles = StyleSheet.create({
  container: {
    flex: 1,
  },
});
Now that we are calling the updated detectObjects function, let's test it by running the snack in the PlayTorch app.
When you press the capture button now, you should see something similar to the following in the logs:
▼{dtype:"float32",shape:[…]}
  dtype:"float32"
  ►shape:[1, 3, 640, 640]
With our tensor in the right shape and ready for inference, let's load a model and run it!
Load model and run inference
Now we get to actually add some ML to our app! Let's walk through the updates we are making to the ObjectDetector.js file in the block below.
- Add the
MobileModelto our imports from the PlayTorch SDK (react-native-pytorch-core) - Create a variable called
MODEL_URLand set it equal to the download link for the YOLOv5 model - Create a variable called
modeland initially set it tonull. We put this variable outside of ourdetectObjectsfunction so we only have to load it once. - Check if the
modelis stillnulland if it is, download the model file from theMODEL_URLand then load themodelinto memory with the newly downloaded file - Run the YOLOv5 model on our
formattedInputTensorby calling themodel.forwardfunction and store the result in a variable calledoutput - Log the
outputto see what our model has generated
import {
  media,
  MobileModel,
  torch,
  torchvision,
} from 'react-native-pytorch-core';

const T = torchvision.transforms;
const IMAGE_SIZE = 640;

const MODEL_URL =
  'https://github.com/facebookresearch/playtorch/releases/download/v0.2.0/yolov5s.ptl';

let model = null;

export default async function detectObjects(image) {
  // Get image width and height
  const imageWidth = image.getWidth();
  const imageHeight = image.getHeight();

  // Convert image to blob, which is a byte representation of the image
  // in the format height (H), width (W), and channels (C), or HWC for short
  const blob = media.toBlob(image);

  // Get a tensor from image the blob and also define in what format
  // the image blob is.
  let tensor = torch.fromBlob(blob, [imageHeight, imageWidth, 3]);

  // Rearrange the tensor shape to be [CHW]
  tensor = tensor.permute([2, 0, 1]);

  // Divide the tensor values by 255 to get values between [0, 1]
  tensor = tensor.div(255);

  // Resize the image tensor to 3 x min(height, IMAGE_SIZE) x min(width, IMAGE_SIZE)
  const resize = T.resize([IMAGE_SIZE, IMAGE_SIZE]);
  tensor = resize(tensor);

  // Center crop the image to IMAGE_SIZE x IMAGE_SIZE
  const centerCrop = T.centerCrop([IMAGE_SIZE]);
  tensor = centerCrop(tensor);

  // Unsqueeze adds 1 leading dimension to the tensor
  const formattedInputTensor = tensor.unsqueeze(0);

  // Load model if not loaded
  if (model == null) {
    console.log('Loading model...');
    const filePath = await MobileModel.download(MODEL_URL);
    model = await torch.jit._loadForMobile(filePath);
    console.log('Model successfully loaded');
  }

  // Run inference
  const output = await model.forward(formattedInputTensor);
  console.log(output);
}
Now that we have code to download and run the model, let's see what it produces!
Remember that it will be slower the first time you run it because it will need to download the model. After that, it should run much faster. It will also need to redownload the model each time you update the code and it reloads on your device. There are plenty of ways to get around this, but we will not cover them in this tutorial.
When you press the capture button now, after the model is done downloading, you should see something similar to the following in the logs:
Loading model...
Model successfully loaded
▼ [{…}]
  ▼ 0:{dtype:"float32",shape:[…]}
      dtype:"float32"
    ► shape:[1, 25200, 85]
    length:1
Hurray! Our model is running! The output seems a bit confusing at first glance though 🤔
Let's unpack this output and format it for the rest of our app to use.
Format model output
In order to make the output easy to use in the rest of our app, we will have to do some transformations of it. Here's a summary of the changes we're making to the ObjectDetector.js file:
- Import the class labels from the
CoCoClasses.jsonfile asCOCO_CLASSES - Add some helper functions to filter results and calulate their box bounds
- Function
IOU: Compute intersection-over-union overlap between two bounding boxes - Function
nonMaxSuppression: Implement Non-maximum Suppression (NMS)- Start with the box that has the highest score
- Remove any remaining boxes that overlap it more than the given threshold amount
- If there are any boxes left (i.e. these did not overlap with any previous boxes), then repeat this procedure, until no more boxes remain or the limit has been reached
- Function
outputsToNMSPredictions- Define confidence score threshold
predictionThresholdto be0.3, intersection-over-union thresholdiOUThresholdto be0.3, and Non-maximum Suppression limitnMSLimitto be15 - Loop over each of the model predictions and do the following:
- Only consider an object detected if the model has a confidence score of over
0.3for that detection - Find the detected objct class with max score and get the
classIndex - Calulate the
boundof the detected object bounding box considering the image scale - Construct
resultand add it toresultsarray
- Only consider an object detected if the model has a confidence score of over
- Define confidence score threshold
- Function
- Continue in the
detectObjectsfunction. - Get
predictionresult from inference and get image scale - Call helper functions to filter
predictionresults and calulate object bounds - Create an empty array called
resultBoxes - Loop over the filtered results and format each detected object with its bounds and class label name, which we can grab out of the
COCO_CLASSESarray by the index. Add the newmatchobject to ourresultBoxesarray with the.pushmethod - Log the result boxes so we can inspect them
- Return the result boxes so whoever calls this function can use them
import {
  media,
  MobileModel,
  torch,
  torchvision,
} from 'react-native-pytorch-core';
import COCO_CLASSES from './CoCoClasses.json';

const T = torchvision.transforms;
const IMAGE_SIZE = 640;

const MODEL_URL =
  'https://github.com/facebookresearch/playtorch/releases/download/v0.2.0/yolov5s.ptl';

let model = null;

/**
 * Computes intersection-over-union overlap between two bounding boxes.
 */
function IOU(a, b) {
  let areaA = (a[2] - a[0]) * (a[3] - a[1]);
  if (areaA <= 0.0) return 0.0;

  let areaB = (b[2] - b[0]) * (b[3] - b[1]);
  if (areaB <= 0.0) return 0.0;

  const intersectionMinX = Math.max(a[0], b[0]);
  const intersectionMinY = Math.max(a[1], b[1]);
  const intersectionMaxX = Math.min(a[2], b[2]);
  const intersectionMaxY = Math.min(a[3], b[3]);
  const intersectionArea =
    Math.max(intersectionMaxY - intersectionMinY, 0) *
    Math.max(intersectionMaxX - intersectionMinX, 0);
  return intersectionArea / (areaA + areaB - intersectionArea);
}

function nonMaxSuppression(boxes, limit, threshold) {
  // Do an argsort on the confidence scores, from high to low.
  const newBoxes = boxes.sort((a, b) => {
    return a.score - b.score;
  });

  const selected = [];
  const active = new Array(newBoxes.length).fill(true);
  let numActive = active.length;

  // The algorithm is simple: Start with the box that has the highest score.
  // Remove any remaining boxes that overlap it more than the given threshold
  // amount. If there are any boxes left (i.e. these did not overlap with any
  // previous boxes), then repeat this procedure, until no more boxes remain
  // or the limit has been reached.
  let done = false;
  for (let i = 0; i < newBoxes.length && !done; i++) {
    if (active[i]) {
      const boxA = newBoxes[i];
      selected.push(boxA);
      if (selected.length >= limit) break;

      for (let j = i + 1; j < newBoxes.length; j++) {
        if (active[j]) {
          const boxB = newBoxes[j];
          if (IOU(boxA.bounds, boxB.bounds) > threshold) {
            active[j] = false;
            numActive -= 1;
            if (numActive <= 0) {
              done = true;
              break;
            }
          }
        }
      }
    }
  }
  return selected;
}

function outputsToNMSPredictions(
  prediction,
  imgScaleX,
  imgScaleY,
  startX,
  startY,
) {
  const predictionThreshold = 0.3;
  const iOUThreshold = 0.3;
  const nMSLimit = 15;
  const results = [];
  const rows = prediction.shape[0];
  const numberOfClass = prediction.shape[1] - 5;
  for (let i = 0; i < rows; i++) {
    const outputs = prediction[i].data();
    // Only consider an object detected if it has a confidence score of over predictionThreshold
    const score = outputs[4];
    if (score > predictionThreshold) {
      // Find the detected objct calss with max score and get the classIndex
      let max = outputs[5];
      let classIndex = 0;
      for (let j = 0; j < numberOfClass; j++) {
        if (outputs[j + 5] > max) {
          max = outputs[j + 5];
          classIndex = j;
        }
      }

      // Calulate the bound of the detected object bounding box
      const x = outputs[0];
      const y = outputs[1];
      const w = outputs[2];
      const h = outputs[3];

      const left = imgScaleX * (x - w / 2);
      const top = imgScaleY * (y - h / 2);

      const bound = [
        startX + left,
        startY + top,
        w * imgScaleX,
        h * imgScaleY,
      ];

      // Construct result and add it to results array
      const result = {
        classIndex: classIndex,
        score: score,
        bounds: bound,
      };
      results.push(result);
    }
  }
  return nonMaxSuppression(results, nMSLimit, iOUThreshold);
}

export default async function detectObjects(image) {
  // Get image width and height
  const imageWidth = image.getWidth();
  const imageHeight = image.getHeight();

  // Convert image to blob, which is a byte representation of the image
  // in the format height (H), width (W), and channels (C), or HWC for short
  const blob = media.toBlob(image);

  // Get a tensor from image the blob and also define in what format
  // the image blob is.
  let tensor = torch.fromBlob(blob, [imageHeight, imageWidth, 3]);

  // Rearrange the tensor shape to be [CHW]
  tensor = tensor.permute([2, 0, 1]);

  // Divide the tensor values by 255 to get values between [0, 1]
  tensor = tensor.div(255);

  // Resize the image tensor to 3 x min(height, IMAGE_SIZE) x min(width, IMAGE_SIZE)
  const resize = T.resize([IMAGE_SIZE, IMAGE_SIZE]);
  tensor = resize(tensor);

  // Center crop the image to IMAGE_SIZE x IMAGE_SIZE
  const centerCrop = T.centerCrop([IMAGE_SIZE]);
  tensor = centerCrop(tensor);

  // Unsqueeze adds 1 leading dimension to the tensor
  const formattedInputTensor = tensor.unsqueeze(0);

  // Load model if not loaded
  if (model == null) {
    console.log('Loading model...');
    const filePath = await MobileModel.download(MODEL_URL);
    model = await torch.jit._loadForMobile(filePath);
    console.log('Model successfully loaded');
  }

  // Run inference
  const output = await model.forward(formattedInputTensor);

  const prediction = output[0];
  const imgScaleX = imageWidth / IMAGE_SIZE;
  const imgScaleY = imageHeight / IMAGE_SIZE;

  // Filter results and calulate bounds
  const results = outputsToNMSPredictions(
    prediction[0],
    imgScaleX,
    imgScaleY,
    0,
    0,
  );

  // Format filtered results with object name and bounds
  const resultBoxes = [];
  for (let i = 0; i < results.length; i++) {
    const result = results[i];
    const nameIdx = result.classIndex;
    const name = COCO_CLASSES[nameIdx];

    const match = {
      objectClass: name,
      bounds: result.bounds,
    };

    resultBoxes.push(match);
  }

  console.log(resultBoxes);
  return resultBoxes;
}
That was a lot of changes! Let's test them out to see what our results look like now.
When you press the capture button now, you should see something like this in the logs:
▼[{…},{…},{…}]
  ▼0:{objectClass:"bowl",bounds:[…]}
    objectClass:"bowl"
    ►bounds:[58.80519703030586,1618.3972656726837,123.18191081285477,98.28389883041382]
  ►1:{objectClass:"person",bounds:[…]}
  ►2:{objectClass:"cup",bounds:[…]}
  length:3
Now that we have the results in a much more usable format with class labels and a bounding box, let's display our results in the app!
Display results
In order to display the results in our app, all we need to do is make some simple changes in our App.js file.
Before we make any changes, we should have a screenState state variable that chooses which screen we show. Currently we are only ever showing the camera screen, so we will need to update that state variable. You can also find a ScreenStates object that has the 3 different screen states our app can have.
We also should notice that we have a state variable called boundingBoxes that is currently always an empty array. That boundingBoxes state variable is passed to our ResultsScreen, so we will need to make sure we updated it for our results to be displayed.
With that understanding of how our app works, let's make some updates to our App.js file. All of our changes will be inside our handleImage function. Here's a summary:
- Update the
imagestate variable to be the newlycapturedImage - Update the
screenStatetoScreenStates.LOADINGin order to display theLoadingScreenwhile our model downloads and runs - In a
tryblock:- Await the result of the
detectObjectsfunction and store it in a variable callednewBoxes - Update the
boundingBoxesstate variable to be thenewBoxes - Update the
screenStatetoScreenStates.RESULTSin order to display theResultsScreenso we can visually see what objects YOLOv5 detected in our image
- Await the result of the
- Add a
catchblock in case there is an error when we run our model:- Call the
handleResetbutton to put the app back in theCameraScreenso we can take a new photo
- Call the
import * as React from 'react';
import {useCallback, useRef, useState} from 'react';
import {
  ActivityIndicator,
  Button,
  SafeAreaView,
  StyleSheet,
  Text,
  TouchableOpacity,
  View,
} from 'react-native';
import {Camera, Canvas, Image} from 'react-native-pytorch-core';
import detectObjects from './ObjectDetector';
import CameraScreen from './screens/CameraScreen';
import LoadingScreen from './screens/LoadingScreen';
import ResultsScreen from './screens/ResultsScreen';

const ScreenStates = {
  CAMERA: 0,
  LOADING: 1,
  RESULTS: 2,
};

export default function ObjectDetectionExample() {
  const [image, setImage] = useState(null);
  const [boundingBoxes, setBoundingBoxes] = useState(null);
  const [screenState, setScreenState] = useState(ScreenStates.CAMERA);

  // Handle the reset button and return to the camera capturing mode
  const handleReset = useCallback(async () => {
    setScreenState(ScreenStates.CAMERA);
    if (image != null) {
      await image.release();
    }
    setImage(null);
    setBoundingBoxes(null);
  }, [image, setScreenState]);

  // This handler function handles the camera's capture event
  async function handleImage(capturedImage) {
    setImage(capturedImage);
    // Wait for image to process through YOLOv5 model and draw resulting image
    setScreenState(ScreenStates.LOADING);
    try {
      const newBoxes = await detectObjects(capturedImage);
      setBoundingBoxes(newBoxes);
      // Switch to the ResultsScreen to display the detected objects
      setScreenState(ScreenStates.RESULTS);
    } catch (err) {
      // In case something goes wrong, go back to the CameraScreen to take a new picture
      handleReset();
    }
  }

  return (
    <SafeAreaView style={styles.container}>
      {screenState === ScreenStates.CAMERA && (
        <CameraScreen onCapture={handleImage} />
      )}
      {screenState === ScreenStates.LOADING && <LoadingScreen />}
      {screenState === ScreenStates.RESULTS && (
        <ResultsScreen
          image={image}
          boundingBoxes={boundingBoxes}
          onReset={handleReset}
        />
      )}
    </SafeAreaView>
  );
}

const styles = StyleSheet.create({
  container: {
    flex: 1,
  },
});
With the results of the detectObjects function hooked up, we are now ready to see the full app working. Load the latest changes into the PlayTorch app and let's test it!
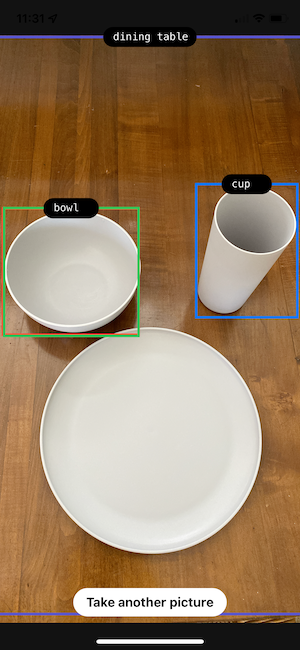
When you press the capture button now, after the model finishes running, you should see the picture you took but with labeled boxes around the detected objects, just like the screenshot below:
Wrapping up
We hope you enjoyed getting an object detection model up and running with PlayTorch.
Providing feedback
Was something unclear? Did you run into any bugs? Is there another tutorial or model you'd like to see from us?
We would love to hear how we can improve.
Come chat with us on Discord or file an issue on GitHub.
Attribution
We want to acknowledge the creators of the model that make this tutorial possible. Find the source code, documentation, and contributors below: