Connecting to a Server Model
In this tutorial, we will connect our PyTorch Live demo to the server we created in the GPT server model tutorial.
You will need to have completed that tutorial for this one to work as is. If you haven't installed the PyTorch Live CLI yet, please follow this tutorial to get started.
If you are just looking for an example of how to connect to your own server model, feel free to follow along and adapt what we do to your situation.
Create a new React Native project
We will start by creating a new React Native project with the PyTorch Live template using the CLI. Run the following command:
npx torchlive-cli init GPTClient
Once that is done, let's go into a our newly created project and run it!
cd GPTClient
yarn android

Adding UI
The aim of this tutorial is to help you integrate your PyTorch Live apps with server models, so we will not spend much time on the UI. We will add some handling for interactions, but won't discuss layout or styling.
That being said, we will start by copying the following code into the file src/demos/MyDemos.tsx:
import React from 'react';
import {
  Text,
  TextInput,
  TouchableOpacity,
  StyleSheet,
  View,
  ScrollView,
  SafeAreaView,
} from 'react-native';

export default function MyDemo() {
  return (
    <SafeAreaView style={styles.container}>
      <ScrollView
        style={styles.scrollContainer}
        keyboardShouldPersistTaps="handled">
        <View style={styles.row}>
          <Text style={styles.label}>
            This example shows how to send and receive text data via POST
            request. You can repurpose this to build an NLP prototype (eg,
            GPT-3) if you implement a server-side AI model.
          </Text>
          <View style={styles.promptBox}>
            <TextInput
              style={styles.textArea}
              placeholder="Once upon a time..."
              placeholderTextColor="#00000033"
              multiline={true}
              numberOfLines={6}
              autoCorrect={false}
            />
            <TouchableOpacity>
              <View style={styles.sendButton}>
                <Text style={styles.buttonText}>Send</Text>
              </View>
            </TouchableOpacity>
          </View>
        </View>

        <View style={[styles.row]}>
          <Text style={styles.label}>Response:</Text>
          <Text style={styles.answer}></Text>
        </View>
      </ScrollView>
    </SafeAreaView>
  );
}

const styles = StyleSheet.create({
  container: {
    flex: 1,
  },
  scrollContainer: {
    backgroundColor: '#ffcac2',
    padding: 30,
  },
  row: {
    flex: 1,
    padding: 15,
    flexDirection: 'column',
    alignItems: 'flex-start',
  },
  rowHidden: {
    opacity: 0,
  },
  label: {
    fontSize: 14,
    color: '#00000099',
    marginBottom: 5,
  },
  textArea: {
    flex: 1,
    alignSelf: 'stretch',
    textAlignVertical: 'top',
    marginLeft: 5,
    color: '#112233',
    fontSize: 16,
  },
  promptBox: {
    flex: 1,
    flexDirection: 'column',
    borderColor: '#ff4c2c33',
    backgroundColor: '#ffffff',
    fontSize: 16,
    borderRadius: 5,
    borderWidth: 1,
    padding: 10,
    marginRight: 5,
    marginVertical: 20,
    alignItems: 'flex-end',
    alignSelf: 'stretch',
  },
  sendButton: {
    backgroundColor: '#812ce5',
    paddingVertical: 15,
    paddingHorizontal: 40,
    alignSelf: 'auto',
    borderRadius: 5,
  },
  buttonText: {
    color: '#ffffff',
    fontSize: 14,
    fontWeight: 'bold',
    marginBottom: 2,
  },
  answer: {
    fontSize: 21,
    color: '#000000',
  },
  smallLabel: {
    fontSize: 12,
    color: '#667788',
    fontFamily: 'Courier New',
  },
});
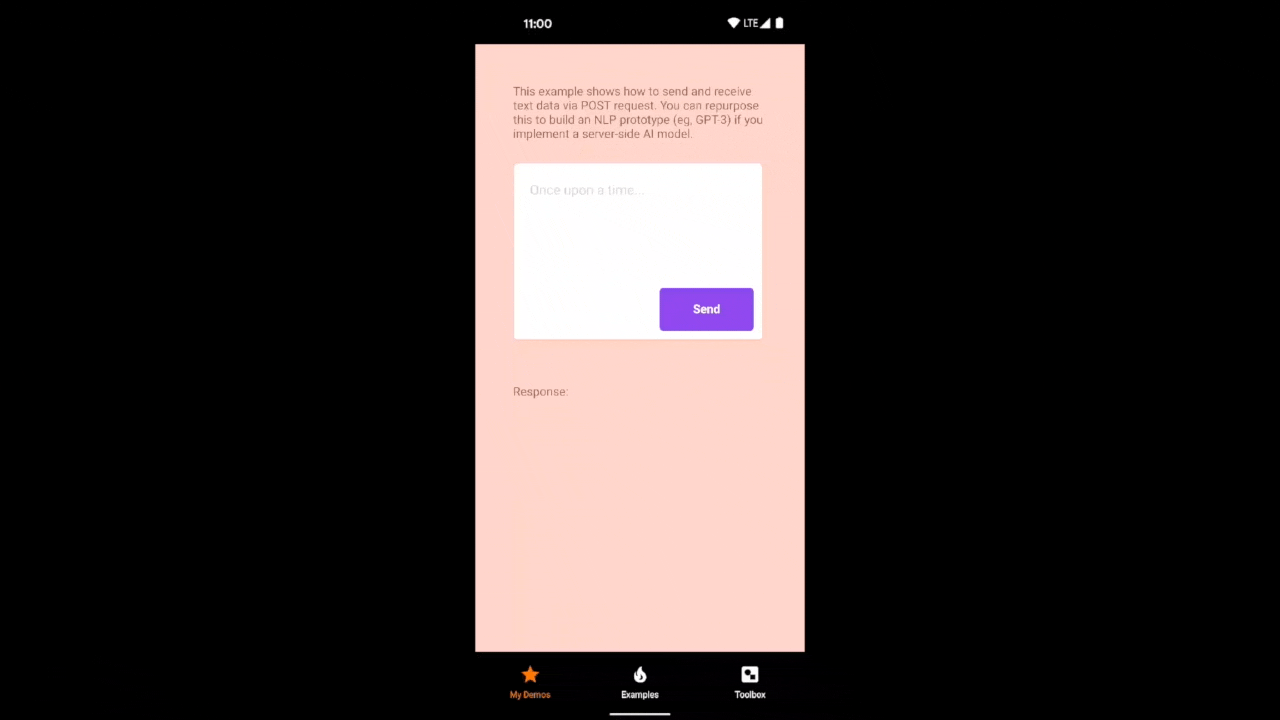
Now you should be see the UI that looks exactly like the screenshot below. However, note that nothing happens when you touch the button. We'll fix that in the next section.

Handling user input
Before we make a request to our server, let's make sure we can handle button clicks and capture the user input.
Our changes are simple. They include:
- Add
useStateto our import statement fromreact - Add
Keyboardto our import statement fromreact-native - Track state of the
resultof our model and thepromptthe user inputs - Create a placeholder function,
generateText(), that simply dismisses the keyboard and makes theresultequal to the prompt the user inputs - Update the
promptstate value when the text changes in the input box - Trigger our placeholder function,
generateText(), when the user presses the "Send" button - Display the
resultstate value below the input
import React, {useState} from 'react';
import {
  Text,
  TextInput,
  TouchableOpacity,
  StyleSheet,
  View,
  ScrollView,
  SafeAreaView,
  Keyboard,
} from 'react-native';

export default function MyDemo() {
  const [result, setResult] = useState('');
  const [prompt, setPrompt] = useState('');
  function generateText() {
    Keyboard.dismiss();
    setResult(prompt);
  }
  return (
    <SafeAreaView style={styles.container}>
      <ScrollView
        style={styles.scrollContainer}
        keyboardShouldPersistTaps="handled">
        <View style={styles.row}>
          <Text style={styles.label}>
            This example shows how to send and receive text data via POST
            request. You can repurpose this to build an NLP prototype (eg,
            GPT-3) if you implement a server-side AI model.
          </Text>
          <View style={styles.promptBox}>
            <TextInput
              style={styles.textArea}
              placeholder="Once upon a time..."
              placeholderTextColor="#00000033"
              multiline={true}
              numberOfLines={6}
              autoCorrect={false}
              onChangeText={setPrompt}
              value={prompt}
            />
            <TouchableOpacity onPress={generateText}>
              <View style={styles.sendButton}>
                <Text style={styles.buttonText}>Send</Text>
              </View>
            </TouchableOpacity>
          </View>
        </View>
        <View style={[styles.row]}>
          <Text style={styles.label}>Response:</Text>
          <Text style={styles.answer}>{result}</Text>
        </View>
      </ScrollView>
    </SafeAreaView>
  );
}
 .
 .
 .
Once you add these changes and the app refreshes you should see the following behavior:

Making a request to the server
With our interaction handling ready to go, we can write the code that will make a request to our server.
We will add one function called fetchData. It does the following:
- Checks to make sure we have set our IP address
- Creates the URL of our server using our IP address
- Creates a FormData object that is used to send input to the server
- Adds the user input prompt to the form data with the key
"prompt"(what our server is expecting) - Kicks off a request using the
fetchAPI and waits for the Response - Checks if the request succeeded and then returns either the generated text from the server or the string "Error" if it failed
import React, {useState} from 'react';
.
.
.

async function fetchData(prompt: string): Promise<string> {
  // IMPORTANT: You MUST set `ipAddress` to your computer's IP address
  // You also must make sure that your computer and your device are on the same network
  const ipAddress = null;
  if (ipAddress === null) {
    throw Error('You must fill in your own IP address!');
  }
  const url = `http://${ipAddress}:5000/gpt`;

  // compose the formdata object to be sent via POST
  const formdata = new FormData();
  formdata.append('prompt', prompt);

  // fetch with a POST request
  const data = await fetch(url, {
    method: 'POST',
    headers: {
      'Content-Type': 'multipart/form-data',
    },
    body: formdata,
  });

  if (data.ok) {
    const jsonResponse = await data.json();
    return jsonResponse.generated_text;
  } else {
    return 'Error';
  }
}

 export default function MyDemo() {
.
.
.
Triggering server request from UI
The last step is to integrate the fetchData function we just created into the UI that we have built.
In addition to calling the function, we will also make sure to handle the loading state, as the model is a bit slow.
Here's a list of the changes:
- Import
ActivityIndicatorfromreact-nativeso we can display a spinner while the server is doing it's work - Create a new state variable to track
loading(when we are waiting on our server) - Re-write our
generateTextfunction:- Make it an
asyncfunction so the server call happens in the background and doesn't freeze the device - Before fetching, set
loadingto true and clear out any previousresult - Kick off and wait for the response from our server with our
fetchDatafunction - When we get the data back, set our
resultto the returned text and set loading tofalse
- Make it an
- Disable our button while
loadingso the user doesn't send requests twice - Display an
<ActivityIndicator />in the results box while the server is loading
import React, {useState} from 'react';
import {
  Text,
  TextInput,
  TouchableOpacity,
  StyleSheet,
  View,
  ScrollView,
  SafeAreaView,
  Keyboard,
  ActivityIndicator,
} from 'react-native';

.
.
.

export default function MyDemo() {
  const [result, setResult] = useState('');
  const [prompt, setPrompt] = useState('');
  const [loading, setLoading] = useState(false);

  const generateText = async () => {
    Keyboard.dismiss();
    setLoading(true);
    setResult('');

    const data: string = await fetchData(prompt);

    setResult(data);
    setLoading(false);
  };

  return (
    <SafeAreaView style={styles.container}>
      <ScrollView
        style={styles.scrollContainer}
        keyboardShouldPersistTaps="handled">
        <View style={styles.row}>
          <Text style={styles.label}>
            This example shows how to send and receive text data via POST
            request. You can repurpose this to build an NLP prototype (eg,
            GPT-3) if you implement a server-side AI model.
          </Text>
          <View style={styles.promptBox}>
            <TextInput
              style={styles.textArea}
              onChangeText={txt => setPrompt(txt)}
              placeholder="Once upon a time..."
              placeholderTextColor="#00000033"
              multiline={true}
              numberOfLines={6}
              autoCorrect={false}
              value={prompt}
            />
            <TouchableOpacity disabled={loading} onPress={generateText}>
              <View style={styles.sendButton}>
                <Text style={styles.buttonText}>Send</Text>
              </View>
            </TouchableOpacity>
          </View>
        </View>

        <View style={[styles.row]}>
          <Text style={styles.label}>Response:</Text>
          <Text style={styles.answer}>
            {loading && <ActivityIndicator size="small" color="tomato" />}
            {result}
          </Text>
        </View>
      </ScrollView>
    </SafeAreaView>
  );
}
.
.
.
If you are trying to run this from a physical Android device, you will also have to edit the file network_security_config.xml in the GPTClient/android/app/src/main/res/xml/ directory to add support for your IP address. Emulators should already work.
See below what that change should look like.
<?xml version="1.0" encoding="utf-8"?>
<network-security-config>
    <domain-config cleartextTrafficPermitted="true">
        <domain includeSubdomains="true">10.0.2.2</domain>
        <domain includeSubdomains="true">localhost</domain>
        <domain includeSubdomains="true">your.ip.address</domain>
    </domain-config>
</network-security-config>
With those changes completed, make sure your server is running and ready to go and you should be able to see results of the GPT model on your app!
Note that the GIF below is drastically sped up. Inference with the GPT model takes some time.
You can find the completed versions of the source code we've written in this tutorial in the examples folder Pytorch Live GitHub repo.
Next steps
Want to enhance your server to support a model with more complex input like images? Check out our tutorial with VQGAN + CLIP to generate images from text descriptions.