Image Classification
In this tutorial, you will build an app that can take pictures and classify objects in each image using an on-device image classification model.
If you haven't installed the PyTorch Live CLI yet, please follow this tutorial to get started.
Initialize New Project
Let's start by initializing a new project ImageClassificationTutorial with the PyTorch Live CLI.
npx torchlive-cli init ImageClassificationTutorial
The project init can take a few minutes depending on your internet connection and your computer.
After completion, navigate to the ImageClassificationTutorial directory created by the init command.
cd ImageClassificationTutorial
Run the project in the Android emulator or iOS Simulator
The run-android and run-ios commands from the PyTorch Live CLI allow you to run the image classification project in the Android emulator or iOS Simulator.
- Android
- iOS (Simulator)
npx torchlive-cli run-android
The app will deploy and run on your physical Android device if it is connected to your computer via USB, and it is in developer mode. There are more details on that in the Get Started tutorial.

npx torchlive-cli run-ios

Keep the app open and running! Any code change will immediately be reflected after saving.
Image Classification Demo
Let's get started with the UI for the image classification. Go ahead and start by copying the following code into the file src/demos/MyDemos.tsx:
The MyDemos.tsx already contains code. Replace the code with the code below.
import * as React from 'react';
import {Text, View} from 'react-native';
import {useSafeAreaInsets} from 'react-native-safe-area-context';

export default function ImageClassificationDemo() {
  // Get safe area insets to account for notches, etc.
  const insets = useSafeAreaInsets();
  return (
    <View style={{marginTop: insets.top, marginBottom: insets.bottom}}>
      <Text>Image Classification</Text>
    </View>
  );
}
- Android
- iOS (Simulator)


The app starts with the "Examples" tab open. In order to see the changes you just made to the MyDemos.tsx, tap on the "My Demos" tab bar item at the bottom of the screen.
Style the component
Great! Let's add some basic styling to the app UI. The styles will change the View component background to #ffffff, spans container view to maximum available width and height, centers components horizontally, and adds a padding of 20 pixels. The Text component will have a margin at the bottom to provide spacing between the text label and the Camera component that will be added in the next steps.
- Changes
- Entire File
@@ -1,13 +1,30 @@
 import * as React from 'react';
-import {Text, View} from 'react-native';
+import {Text, StyleSheet, View} from 'react-native';
 import {useSafeAreaInsets} from 'react-native-safe-area-context';

 export default function ImageClassificationDemo() {
   // Get safe area insets to account for notches, etc.
   const insets = useSafeAreaInsets();
   return (
-    <View style={{marginTop: insets.top, marginBottom: insets.bottom}}>
-      <Text>Image Classification</Text>
+    <View
+      style={[
+        styles.container,
+        {marginTop: insets.top, marginBottom: insets.bottom},
+      ]}>
+      <Text style={styles.label}>Image Classification</Text>
     </View>
   );
 }
+
+const styles = StyleSheet.create({
+  container: {
+    alignItems: 'center',
+    backgroundColor: '#ffffff',
+    display: 'flex',
+    flexGrow: 1,
+    padding: 20,
+  },
+  label: {
+    marginBottom: 10,
+  },
+});
import * as React from 'react';
import {Text, StyleSheet, View} from 'react-native';
import {useSafeAreaInsets} from 'react-native-safe-area-context';

export default function ImageClassificationDemo() {
  // Get safe area insets to account for notches, etc.
  const insets = useSafeAreaInsets();
  return (
    <View
      style={[
        styles.container,
        {marginTop: insets.top, marginBottom: insets.bottom},
      ]}>
      <Text style={styles.label}>Image Classification</Text>
    </View>
  );
}

const styles = StyleSheet.create({
  container: {
    alignItems: 'center',
    backgroundColor: '#ffffff',
    display: 'flex',
    flexGrow: 1,
    padding: 20,
  },
  label: {
    marginBottom: 10,
  },
});
- Android
- iOS (Simulator)


Add camera component
Next, let's add a Camera component to take pictures that can be used later for the ML model inference to classify what object is in the picture. The camera will also get a basic style to fill the remaining space in the container.
- Changes
- Entire File
@@ -1,5 +1,6 @@
 import * as React from 'react';
 import {Text, StyleSheet, View} from 'react-native';
+import {Camera} from 'react-native-pytorch-core';
 import {useSafeAreaInsets} from 'react-native-safe-area-context';

 export default function ImageClassificationDemo() {
@@ -12,6 +13,7 @@
         {marginTop: insets.top, marginBottom: insets.bottom},
       ]}>
       <Text style={styles.label}>Image Classification</Text>
+      <Camera style={styles.camera} />
     </View>
   );
 }
@@ -20,11 +22,14 @@
   container: {
     alignItems: 'center',
     backgroundColor: '#ffffff',
-    display: 'flex',
     flexGrow: 1,
     padding: 20,
   },
   label: {
     marginBottom: 10,
   },
+  camera: {
+    flexGrow: 1,
+    width: '100%',
+  },
 });
import * as React from 'react';
import {Text, StyleSheet, View} from 'react-native';
import {Camera} from 'react-native-pytorch-core';
import {useSafeAreaInsets} from 'react-native-safe-area-context';

export default function ImageClassificationDemo() {
  // Get safe area insets to account for notches, etc.
  const insets = useSafeAreaInsets();
  return (
    <View
      style={[
        styles.container,
        {marginTop: insets.top, marginBottom: insets.bottom},
      ]}>
      <Text style={styles.label}>Image Classification</Text>
      <Camera style={styles.camera} />
    </View>
  );
}

const styles = StyleSheet.create({
  container: {
    alignItems: 'center',
    backgroundColor: '#ffffff',
    flexGrow: 1,
    padding: 20,
  },
  label: {
    marginBottom: 10,
  },
  camera: {
    flexGrow: 1,
    width: '100%',
  },
});
- Android
- iOS (Simulator)
- iOS

In order to get the camera to work on iOS, you'll have to run the app on a physical iOS device. For more details, please check out the Running On Device docs on the React Native website.

In order to get the camera to work on iOS, you'll have to run the app on a physical iOS device. For more details, please check out the Running On Device docs on the React Native website.
Open the ImageClassificationTutorial Xcode workspace to run the project on a physical iOS device.
open ios/ImageClassificationTutorial.xcworkspace
Run app on physical device.

Add capture callback to camera
To receive an image whenever the camera capture button is pressed, we add an async handleImage function and set it for the onCapture property of the Camera component. This handleImage function will be called with an image from the camera when the capture button is pressed.
As a first step, let's log image to the console.
The image.release() function call is important to release the memory allocated for the image object. This is a vital step to make sure we don't run out of memory on images we no longer need.
- Changes
- Entire File
@@ -1,11 +1,19 @@
 import * as React from 'react';
 import {Text, StyleSheet, View} from 'react-native';
-import {Camera} from 'react-native-pytorch-core';
+import {Camera, Image} from 'react-native-pytorch-core';
 import {useSafeAreaInsets} from 'react-native-safe-area-context';

 export default function ImageClassificationDemo() {
   // Get safe area insets to account for notches, etc.
   const insets = useSafeAreaInsets();
+
+  async function handleImage(image: Image) {
+    // Log captured image to Metro console
+    console.log(image);
+    // It is important to release the image to avoid memory leaks
+    image.release();
+  }
+
   return (
     <View
       style={[
@@ -13,7 +21,7 @@
         {marginTop: insets.top, marginBottom: insets.bottom},
       ]}>
       <Text style={styles.label}>Image Classification</Text>
-      <Camera style={styles.camera} />
+      <Camera style={styles.camera} onCapture={handleImage} />
     </View>
   );
 }
import * as React from 'react';
import {Text, StyleSheet, View} from 'react-native';
import {Camera, Image} from 'react-native-pytorch-core';
import {useSafeAreaInsets} from 'react-native-safe-area-context';

export default function ImageClassificationDemo() {
  // Get safe area insets to account for notches, etc.
  const insets = useSafeAreaInsets();

  async function handleImage(image: Image) {
    // Log captured image to Metro console
    console.log(image);
    // It is important to release the image to avoid memory leaks
    image.release();
  }

  return (
    <View
      style={[
        styles.container,
        {marginTop: insets.top, marginBottom: insets.bottom},
      ]}>
      <Text style={styles.label}>Image Classification</Text>
      <Camera style={styles.camera} onCapture={handleImage} />
    </View>
  );
}

const styles = StyleSheet.create({
  container: {
    alignItems: 'center',
    backgroundColor: '#ffffff',
    flexGrow: 1,
    padding: 20,
  },
  label: {
    marginBottom: 10,
  },
  camera: {
    flexGrow: 1,
    width: '100%',
  },
});
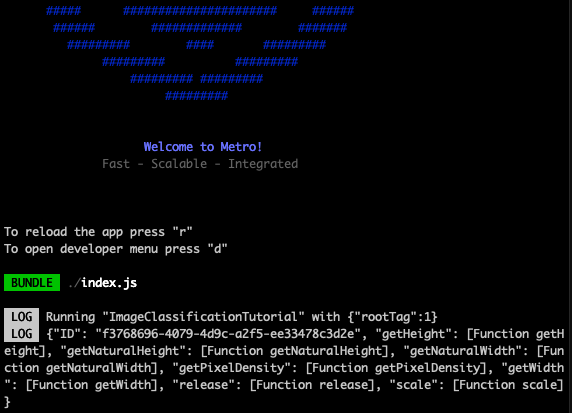
Click on camera capture button and check logged output in terminal. It will log a JavaScript representation of the image to the console every time you click the capture button.
Run model inference
Fantastic! Now let's use the image and run inference on a captured image.
We'll require the MobileNet V3 (small) model and add the ImageClassificationResult type for type-safety. Then, we call the execute function on the MobileModel object with the model as first argument and an object with the image as second argument.
Don't forget the await keyword for the MobileModel.execute function call!
Last, let's log the inference result to the console.
- Changes
- Entire File
@@ -1,15 +1,28 @@
 import * as React from 'react';
 import {Text, StyleSheet, View} from 'react-native';
-import {Camera, Image} from 'react-native-pytorch-core';
+import {Camera, Image, MobileModel} from 'react-native-pytorch-core';
 import {useSafeAreaInsets} from 'react-native-safe-area-context';

+const model = require('../../models/mobilenet_v3_small.ptl');
+
+type ImageClassificationResult = {
+  maxIdx: number;
+  confidence: number;
+};
+
 export default function ImageClassificationDemo() {
   // Get safe area insets to account for notches, etc.
   const insets = useSafeAreaInsets();

   async function handleImage(image: Image) {
-    // Log captured image to Metro console
-    console.log(image);
+    const inferenceResult =
+      await MobileModel.execute<ImageClassificationResult>(model, {
+        image,
+      });
+
+    // Log model inference result to Metro console
+    console.log(inferenceResult);
+
     // It is important to release the image to avoid memory leaks
     image.release();
   }
import * as React from 'react';
import {Text, StyleSheet, View} from 'react-native';
import {Camera, Image, MobileModel} from 'react-native-pytorch-core';
import {useSafeAreaInsets} from 'react-native-safe-area-context';

const model = require('../../models/mobilenet_v3_small.ptl');

type ImageClassificationResult = {
  maxIdx: number;
  confidence: number;
};

export default function ImageClassificationDemo() {
  // Get safe area insets to account for notches, etc.
  const insets = useSafeAreaInsets();

  async function handleImage(image: Image) {
    const inferenceResult =
      await MobileModel.execute<ImageClassificationResult>(model, {
        image,
      });

    // Log model inference result to Metro console
    console.log(inferenceResult);

    // It is important to release the image to avoid memory leaks
    image.release();
  }

  return (
    <View
      style={[
        styles.container,
        {marginTop: insets.top, marginBottom: insets.bottom},
      ]}>
      <Text style={styles.label}>Image Classification</Text>
      <Camera style={styles.camera} onCapture={handleImage} />
    </View>
  );
}

const styles = StyleSheet.create({
  container: {
    alignItems: 'center',
    backgroundColor: '#ffffff',
    flexGrow: 1,
    padding: 20,
  },
  label: {
    marginBottom: 10,
  },
  camera: {
    flexGrow: 1,
    width: '100%',
  },
});
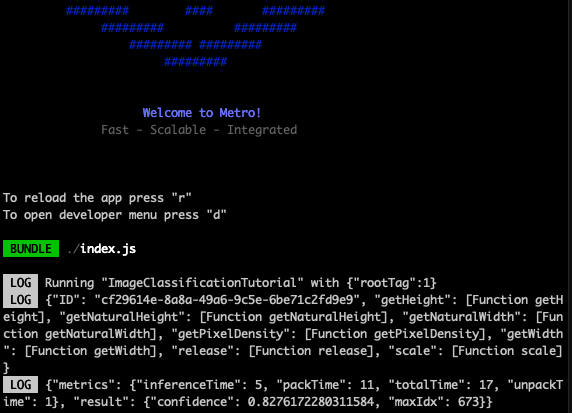
The logged inference result is a JavaScript object containing the inference result including the maxIdx (argmax result) mapping to the top class detected in the image, a confidence value for this class to be correct, and inference metrics (i.e., inference time, pack time, unpack time, and total time).
Get top image class
Ok! So, we have an maxIdx number as inference result (i.e., 673). It's not sensible to show a maxIdx to the user, so let's get label for the top class. For this, we need to import the image classes for this model, which is the MobileNetV3Classes JSON file containing an array of 1000 class labels. The maxIdx maps to a label representing the top class.
Here, we require the JSON file into the ImageClasses variable and use ImageClasses to retrieve the label for the top class using the maxIdx returned from the inference.
Let's see what the maxIdx 673 resolves into by logging the topClass label to the console!
- Changes
- Entire File
@@ -10,18 +10,25 @@
   confidence: number;
 };

+const ImageClasses = require('../MobileNetV3Classes');
+
 export default function ImageClassificationDemo() {
   // Get safe area insets to account for notches, etc.
   const insets = useSafeAreaInsets();

   async function handleImage(image: Image) {
-    const inferenceResult =
-      await MobileModel.execute<ImageClassificationResult>(model, {
+    const {result} = await MobileModel.execute<ImageClassificationResult>(
+      model,
+      {
         image,
-      });
+      },
+    );
+
+    // Get max index (argmax) result to resolve the top class name
+    const topClass = ImageClasses[result.maxIdx];

-    // Log model inference result to Metro console
-    console.log(inferenceResult);
+    // Log top class to Metro console
+    console.log(topClass);

     // It is important to release the image to avoid memory leaks
     image.release();
import * as React from 'react';
import {Text, StyleSheet, View} from 'react-native';
import {Camera, Image, MobileModel} from 'react-native-pytorch-core';
import {useSafeAreaInsets} from 'react-native-safe-area-context';

const model = require('../../models/mobilenet_v3_small.ptl');

type ImageClassificationResult = {
  maxIdx: number;
  confidence: number;
};

const ImageClasses = require('../MobileNetV3Classes');

export default function ImageClassificationDemo() {
  // Get safe area insets to account for notches, etc.
  const insets = useSafeAreaInsets();

  async function handleImage(image: Image) {
    const {result} = await MobileModel.execute<ImageClassificationResult>(
      model,
      {
        image,
      },
    );

    // Get max index (argmax) result to resolve the top class name
    const topClass = ImageClasses[result.maxIdx];

    // Log top class to Metro console
    console.log(topClass);

    // It is important to release the image to avoid memory leaks
    image.release();
  }

  return (
    <View
      style={[
        styles.container,
        {marginTop: insets.top, marginBottom: insets.bottom},
      ]}>
      <Text style={styles.label}>Image Classification</Text>
      <Camera style={styles.camera} onCapture={handleImage} />
    </View>
  );
}

const styles = StyleSheet.create({
  container: {
    alignItems: 'center',
    backgroundColor: '#ffffff',
    flexGrow: 1,
    padding: 20,
  },
  label: {
    marginBottom: 10,
  },
  camera: {
    flexGrow: 1,
    width: '100%',
  },
});
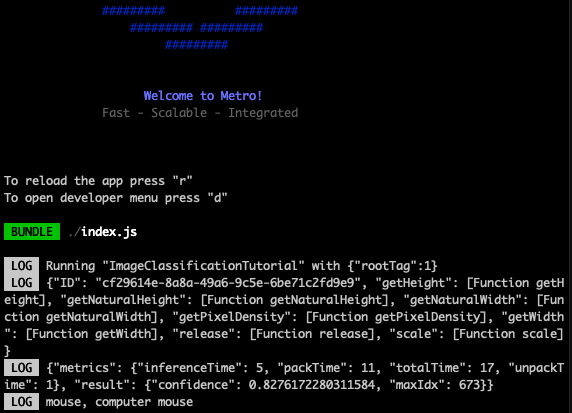
It looks like the model classified the image as mouse, computer mouse. The next section will reveal if this is correct!
Show top image class
Instead of having the end-user looking at a console log, we will render the top image class in the app. We'll add a state for the objectClass using a React Hook, and when a class is detected, we'll set the top class as object class using the setObjectClass function.
The user interface will automatically re-render whenever the setObjectClass function is called with a new value, so you don't have to worry about calling anything else besides this function. On re-render, the objectClass variable will have this new value, so we can use it to render it on the screen.
The React.useState is a React Hook. Hooks allow React function components, like our ImageClassificationTutorial function component, to remember things.
For more information on React Hooks, head over to the React docs where you can read or watch explanations.
- Changes
- Entire File
@@ -16,6 +16,9 @@
   // Get safe area insets to account for notches, etc.
   const insets = useSafeAreaInsets();

+  // Component state that holds the detected object class
+  const [objectClass, setObjectClass] = React.useState<string>('');
+
   async function handleImage(image: Image) {
     const {result} = await MobileModel.execute<ImageClassificationResult>(
       model,
@@ -27,8 +30,8 @@
     // Get max index (argmax) result to resolve the top class name
     const topClass = ImageClasses[result.maxIdx];

-    // Log top class to Metro console
-    console.log(topClass);
+    // Set object class state to be the top class detected in the image
+    setObjectClass(topClass);

     // It is important to release the image to avoid memory leaks
     image.release();
@@ -40,7 +43,7 @@
         styles.container,
         {marginTop: insets.top, marginBottom: insets.bottom},
       ]}>
-      <Text style={styles.label}>Image Classification</Text>
+      <Text style={styles.label}>Object: {objectClass}</Text>
       <Camera style={styles.camera} onCapture={handleImage} />
     </View>
   );
import * as React from 'react';
import {Text, StyleSheet, View} from 'react-native';
import {Camera, Image, MobileModel} from 'react-native-pytorch-core';
import {useSafeAreaInsets} from 'react-native-safe-area-context';

const model = require('../../models/mobilenet_v3_small.ptl');

type ImageClassificationResult = {
  maxIdx: number;
  confidence: number;
};

const ImageClasses = require('../MobileNetV3Classes');

export default function ImageClassificationDemo() {
  // Get safe area insets to account for notches, etc.
  const insets = useSafeAreaInsets();

  // Component state that holds the detected object class
  const [objectClass, setObjectClass] = React.useState<string>('');

  async function handleImage(image: Image) {
    const {result} = await MobileModel.execute<ImageClassificationResult>(
      model,
      {
        image,
      },
    );

    // Get max index (argmax) result to resolve the top class name
    const topClass = ImageClasses[result.maxIdx];

    // Set object class state to be the top class detected in the image
    setObjectClass(topClass);

    // It is important to release the image to avoid memory leaks
    image.release();
  }

  return (
    <View
      style={[
        styles.container,
        {marginTop: insets.top, marginBottom: insets.bottom},
      ]}>
      <Text style={styles.label}>Object: {objectClass}</Text>
      <Camera style={styles.camera} onCapture={handleImage} />
    </View>
  );
}

const styles = StyleSheet.create({
  container: {
    alignItems: 'center',
    backgroundColor: '#ffffff',
    flexGrow: 1,
    padding: 20,
  },
  label: {
    marginBottom: 10,
  },
  camera: {
    flexGrow: 1,
    width: '100%',
  },
});
- Android
- iOS


It looks like the model correctly classified the object in the image as a mouse, computer mouse!
Confidence threshold
Nice! The model will return a top class for what it thinks is in the image. However, it's not always 100% confident about each classification, and therefore returns a confidence value as part of the result. To see what the metrics looks like, have a look at the step where we logged the inferenceResult to the console!
Let's use this confidence value as a threshold, and only show top classes where the model has a confidence higher than 0.3 (the confidence range is [0, 1]).
- Changes
- Entire File
@@ -27,11 +27,16 @@
       },
     );

-    // Get max index (argmax) result to resolve the top class name
-    const topClass = ImageClasses[result.maxIdx];
+    if (result.confidence > 0.3) {
+      // Get max index (argmax) result to resolve the top class name
+      const topClass = ImageClasses[result.maxIdx];

-    // Set object class state to be the top class detected in the image
-    setObjectClass(topClass);
+      // Set object class state to be the top class detected in the image
+      setObjectClass(topClass);
+    } else {
+      // Reset the object class if confidence value is low
+      setObjectClass('');
+    }

     // It is important to release the image to avoid memory leaks
     image.release();
import * as React from 'react';
import {Text, StyleSheet, View} from 'react-native';
import {Camera, Image, MobileModel} from 'react-native-pytorch-core';
import {useSafeAreaInsets} from 'react-native-safe-area-context';

const model = require('../../models/mobilenet_v3_small.ptl');

type ImageClassificationResult = {
  maxIdx: number;
  confidence: number;
};

const ImageClasses = require('../MobileNetV3Classes');

export default function ImageClassificationDemo() {
  // Get safe area insets to account for notches, etc.
  const insets = useSafeAreaInsets();

  // Component state that holds the detected object class
  const [objectClass, setObjectClass] = React.useState<string>('');

  async function handleImage(image: Image) {
    const {result} = await MobileModel.execute<ImageClassificationResult>(
      model,
      {
        image,
      },
    );

    if (result.confidence > 0.3) {
      // Get max index (argmax) result to resolve the top class name
      const topClass = ImageClasses[result.maxIdx];

      // Set object class state to be the top class detected in the image
      setObjectClass(topClass);
    } else {
      // Reset the object class if confidence value is low
      setObjectClass('');
    }

    // It is important to release the image to avoid memory leaks
    image.release();
  }

  return (
    <View
      style={[
        styles.container,
        {marginTop: insets.top, marginBottom: insets.bottom},
      ]}>
      <Text style={styles.label}>Object: {objectClass}</Text>
      <Camera style={styles.camera} onCapture={handleImage} />
    </View>
  );
}

const styles = StyleSheet.create({
  container: {
    alignItems: 'center',
    backgroundColor: '#ffffff',
    flexGrow: 1,
    padding: 20,
  },
  label: {
    marginBottom: 10,
  },
  camera: {
    flexGrow: 1,
    width: '100%',
  },
});
Frame-by-Frame image processing
As a bonus, you can change the onCapture property to the onFrame property to do a frame-by-frame image classification, so you don't have to repeatedly press the capture button, and you can roam the phone around your place to see what the model can detect correctly.
Known problem: If the images aren't immediately processed frame by frame, flip the camera twice.
- Changes
- Entire File
@@ -49,7 +49,11 @@
         {marginTop: insets.top, marginBottom: insets.bottom},
       ]}>
       <Text style={styles.label}>Object: {objectClass}</Text>
-      <Camera style={styles.camera} onCapture={handleImage} />
+      <Camera
+        style={styles.camera}
+        onFrame={handleImage}
+        hideCaptureButton={true}
+      />
     </View>
   );
 }
import * as React from 'react';
import {Text, StyleSheet, View} from 'react-native';
import {Camera, Image, MobileModel} from 'react-native-pytorch-core';
import {useSafeAreaInsets} from 'react-native-safe-area-context';

const model = require('../../models/mobilenet_v3_small.ptl');

type ImageClassificationResult = {
  maxIdx: number;
  confidence: number;
};

const ImageClasses = require('../MobileNetV3Classes');

export default function ImageClassificationDemo() {
  // Get safe area insets to account for notches, etc.
  const insets = useSafeAreaInsets();

  // Component state that holds the detected object class
  const [objectClass, setObjectClass] = React.useState<string>('');

  async function handleImage(image: Image) {
    const {result} = await MobileModel.execute<ImageClassificationResult>(
      model,
      {
        image,
      },
    );

    if (result.confidence > 0.3) {
      // Get max index (argmax) result to resolve the top class name
      const topClass = ImageClasses[result.maxIdx];

      // Set object class state to be the top class detected in the image
      setObjectClass(topClass);
    } else {
      // Reset the object class if confidence value is low
      setObjectClass('');
    }

    // It is important to release the image to avoid memory leaks
    image.release();
  }

  return (
    <View
      style={[
        styles.container,
        {marginTop: insets.top, marginBottom: insets.bottom},
      ]}>
      <Text style={styles.label}>Object: {objectClass}</Text>
      <Camera
        style={styles.camera}
        onFrame={handleImage}
        hideCaptureButton={true}
      />
    </View>
  );
}

const styles = StyleSheet.create({
  container: {
    alignItems: 'center',
    backgroundColor: '#ffffff',
    flexGrow: 1,
    padding: 20,
  },
  label: {
    marginBottom: 10,
  },
  camera: {
    flexGrow: 1,
    width: '100%',
  },
});
- Android
- iOS


Congratulations! You finished your first PyTorch Live tutorial.
Next steps
PyTorch Live comes with three image classification models that are ready to use. In the example code provided in this tutorial, we use mobilenet_v3_small.ptl for inference, but feel free to try out the others by replacing the model with code from the tabbed viewer below.
- MobileNet v3 Small
- MobileNet v3 Large
- ResNet-18
const model = require('../../models/mobilenet_v3_small.ptl');
const model = require('../../models/mobilenet_v3_large.ptl');
const model = require('../../models/resnet18.ptl');
Challenge
Rank the models from slowest to fastest!
Log the metrics from the inference result to the console or render it on the screen!
Use custom image classification model
You can follow the Prepare Custom Model tutorial to prepare your own classification model that you can plug into the demo code provided here.